How to setup a TP-Link TL-WR841N Router
The TP-Link WR841N router is essentially ready to be used right out of the box. It comes pre-setup for basic operation as a wireless router from the factory. You can connect to its pre-configured Wi-Fi using the information on the bottom sticker of the router. Simply plug your Internet connection into the routers WAN (internet) port, and you’re off and running.
Advanced Setup Guide
If you desire something other than the baseline configuration. You can use this guide to get your TL-WR841N setup in minutes thanks to its intuitive web interface. It is a highly reliable and budget friendly router option for small households.
A note before beginning…
Before starting the configuration, we recommend plugging your internet connection into the routers WAN (internet) port. This should be the only “Blue” port on the back of the router.
While it is possible to program the router for the first time using its pre-configured Wi-Fi, it adds a few steps that can complicate matters if you don’t already know what you’re doing. For the purposes of this guide we are going to recommend that you use the included Ethernet cable to plug your computer into one of the four (4) LAN ports on the back of the router. After successfully connecting your computer to the router using the provided Ethernet cable, you can follow the rest of this setup guide.

Step 1. Login to the router’s graphic user interface (GUI) using your web browser.
Open a browser window and navigate to one of the two websites: http://tplinklogin.net or http://192.168.1.1 (you can also just click one of the links).
The default Username is: “admin“, and the default Password is: “admin“. We recommend changing this to a secure (not easy to guess) password. Make sure you remember what this is (write it down somewhere).
After logging into the router you will see a webpage with a menu on the left.
Step 2. Verify or change the LAN network address of the router
- Click on “Network” on the left menu
- Click on “LAN”.
- Change the “IP address” to “192.168.1.1” (if it is already correct – move on)
- Click “Save”
The router may reboot after this step. If it does wait a moment while the settings apply. Login again if prompted.

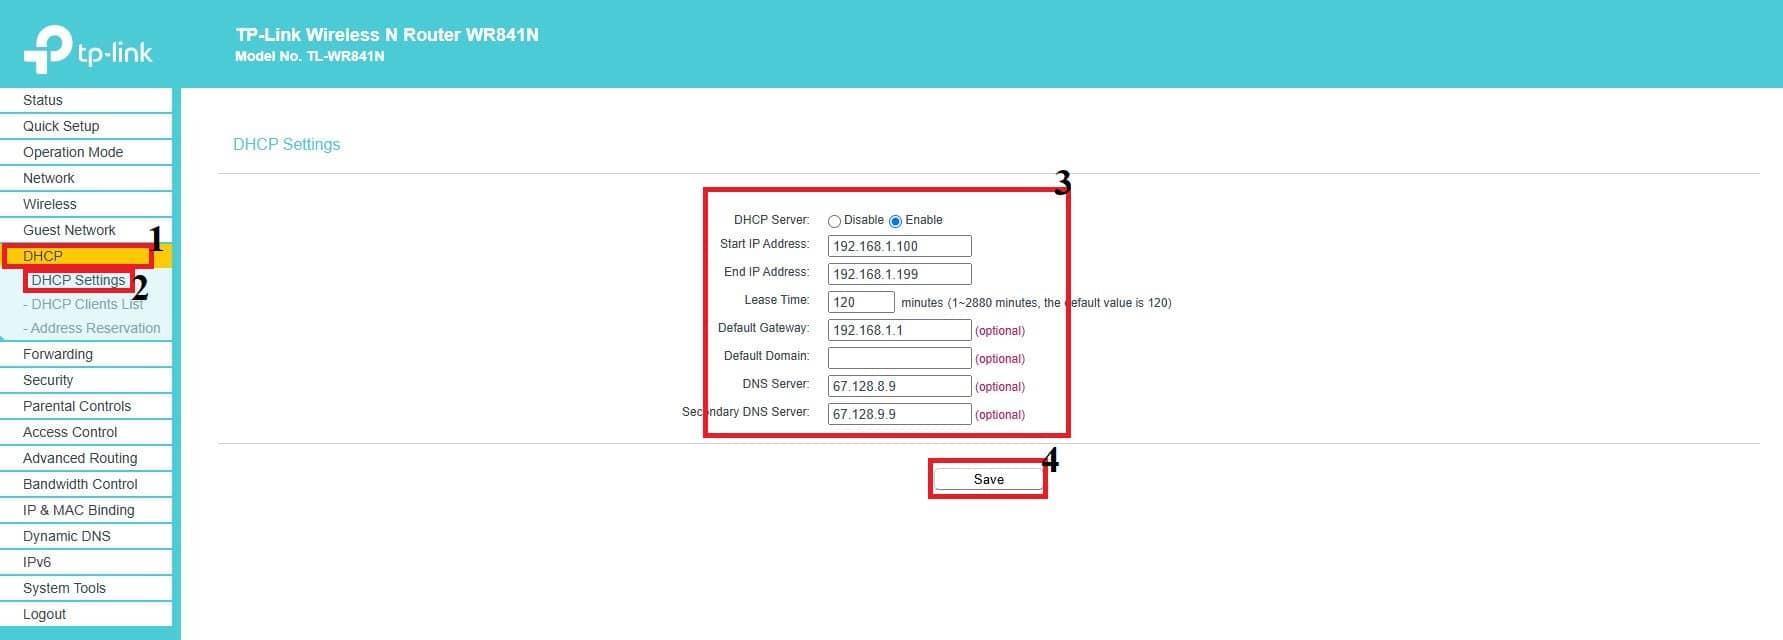
Step 3. Modify the DHCP settings for the router
- Click on “DHCP” on the left menu
- Click on “DHCP Settings”.
- Change the “Start IP address” to “192.168.1.100”, the “End IP address” to “192.168.1.199”, and the two “DNS servers” to “67.128.8.9” and “67.128.9.9”.
- Click “Save”
The router may reboot after this step. If it does wait a moment while the settings apply. Login again if prompted.
Step 4. Program the WAN (internet) interface of the router
- Click on “Network” on the left menu
- Click on “WAN”.
- Change the “Connection Type” to “Static IP”.
- Change the “IP address” to “192.168.0.52”, the “Subnet Mask” to “255.255.255.0”, the “Gateway” to “192.168.0.1”, and the two “DNS Servers” as “67.128.8.9” and “67.128.9.9”.
- Click “Save”
Wait for the settings to take effect.

Step 5. Configure the Wi-Fi network name
- Click on “Wireless” on the left menu
- Click on “Basic Settings”.
- Change the “Wireless Network Name” to whatever you want as your Wi-Fi name.
- Change the “channel” and “channel width” to “Auto”.
- Click “Save”
Wait for the settings to take effect.

Step 6. Configure the Wi-Fi security key (password)
- Click on “Wireless” on the left menu.
- Click on “Wireless Security”.
- Select the “WPA/WPA2” radio button.
- Change the “Version” to “WPA2-PSK”, the “Encryption” to “AES”, and then finally set the “Wireless Password” to whatever you want your Wi-Fi password to be (we recommend no less than 10 characters in length).
- Click “Save”
Wait for the settings to take effect.

Step 7. Configure the router’s time zone
- Click on “System Tools” on the left menu.
- Click on “Time Settings”.
- Select “GMT-07:00 – Mountain Standard Time” from the dropdown menu.
- Change the “NTP Server 1” to “us.pool.ntp.org”.
- Click “Save”
Wait for the settings to take effect.

Step 8. Setup a DMZ on the router (used for forwarding all ports to a network location)
- Click on “Forwarding” on the left menu.
- Click on “DMZ”.
- Select “Enable” next to “DMZ Status”.
- Change the “DMZ Host IP Address” to “192.168.1.52” (or whatever the IP address is of the device you want to forward to – e.g. XBOX).
- Click “Save”
Wait for the settings to take effect.

Step 9. Perform any additional port forwarding that may be required
- Click on “Forwarding” on the left menu.
- Click on “Virtual Server”.
- Add a new port forwarding rule.
- Click “Save”
Wait for the settings to take effect.

Verify you can connect to Wi-Fi and that your Internet and any special settings are working properly.
That’s it, you have successfully customized the configuration of your TP-Link TL-WR841N router. While there are a lot more features that this router has built in – if you know what they’re for, you wouldn’t be reading this article on how to use them.
Hit a roadblock or didn’t understand a step? Give our technical support a call, they’ll gladly help you get it right. (520) 421-3333 opt. 2.