
Troubleshooting “No Internet Connection” on SINGLE Device
Alright, we’ve confirmed that your internet connection works on all other devices… except the one you want to use!
Let’s see if we can help you figure out why your device isn’t cooperating with you. There are numerous reasons devices stop functioning, but thankfully – most are quite easy to troubleshoot and resolve.
1. Determine if your device is using Wi-Fi or Ethernet to connect to the Internet.
This is actually very simple to identify. If you are on a phone or tablet, your device is likely using Wi-Fi to connect to the Internet. However, if you are using a Smart TV, Streaming Device, Gaming Console, Laptop, or Desktop PC, you could be using Ethernet or Wi-Fi to connect to the Internet.
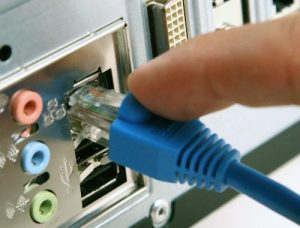
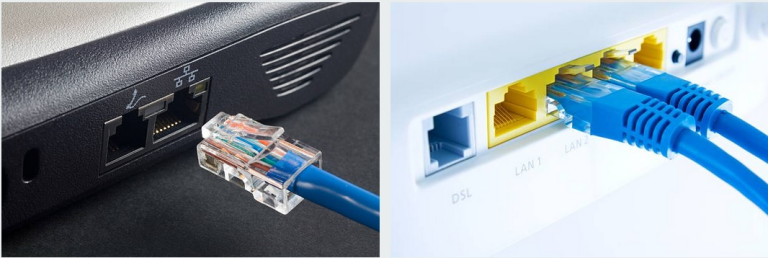
Check to see if there is a cable plugged into the device that looks like this; if you do not see one, the device is likely using Wi-Fi to connect to the Internet. If you do see this cable, try unplugging it and plugging it back in (be sure to depress the clip on the cable before removing it – just like a telephone cable). Trace the cable and ensure the other end is plugged into the router or switch and hasn’t been damaged in any way.
If you do not see the Ethernet cable connected to the device, check around it to see if the cable may have become unplugged. If it has, plug it back in. Wait about 90 seconds for the device to connect to the network, then check if your Internet service is working again. If the Internet is still not functional on this device, follow the cable to ensure it is plugged into the router or switch. If there is still no Internet connection, try replacing the cable with another Ethernet cable or use Wi-Fi to connect to the Internet (if the device has Wi-Fi capability).
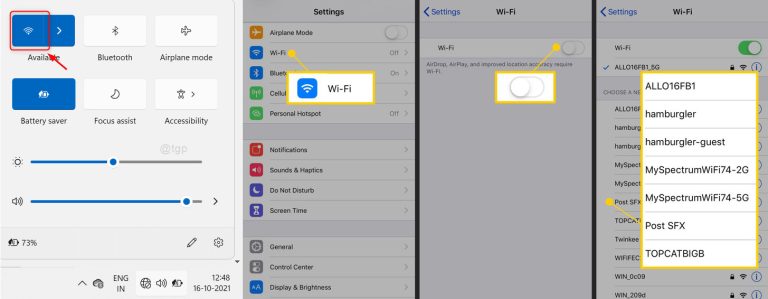
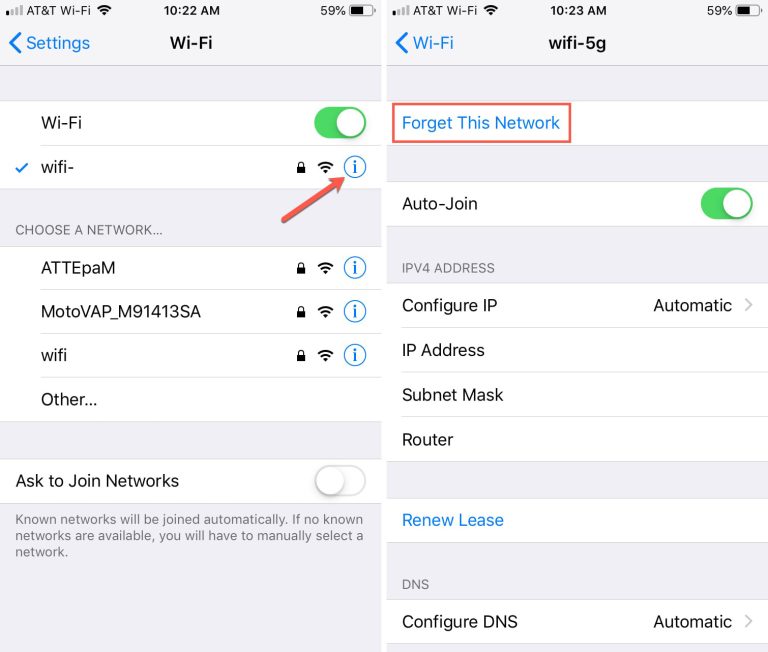
If your device is using Wi-Fi to connect to the Internet, the first step is to ensure that it is connected to your Wi-Fi network! This process may vary by device, but generally, you want to navigate to the section of the device where you can check your connection status. It should resemble one of the photos below. If your device is not connected but you can see your Wi-Fi network, select it and click on “Connect.” If presented with the option to “Automatically connect to this network,” make sure it is selected before clicking “Connect.” If you do not see any networks, confirm that your Wi-Fi is enabled on the device before going further. Ensure that Airplane Mode is not activated. Recheck your connection once your device indicates that it is connected to your Wi-Fi.
If you do not see your Wi-Fi network at all in the list of available networks, try power cycling your router. Wait 90 seconds, then recheck to see if your Wi-Fi network appears in the list and follow the above steps to connect. If you see other networks but not yours, someone may have pressed the reset button on the router. If that’s the case, the router will have returned to its factory default settings. Check the bottom sticker on the router for “SSID: XXXX” and “Passcode/PIN: XXXX”. Now check your device to see if you can find this network. If it appears, use the passcode to connect to that network and verify if you have an active internet connection.

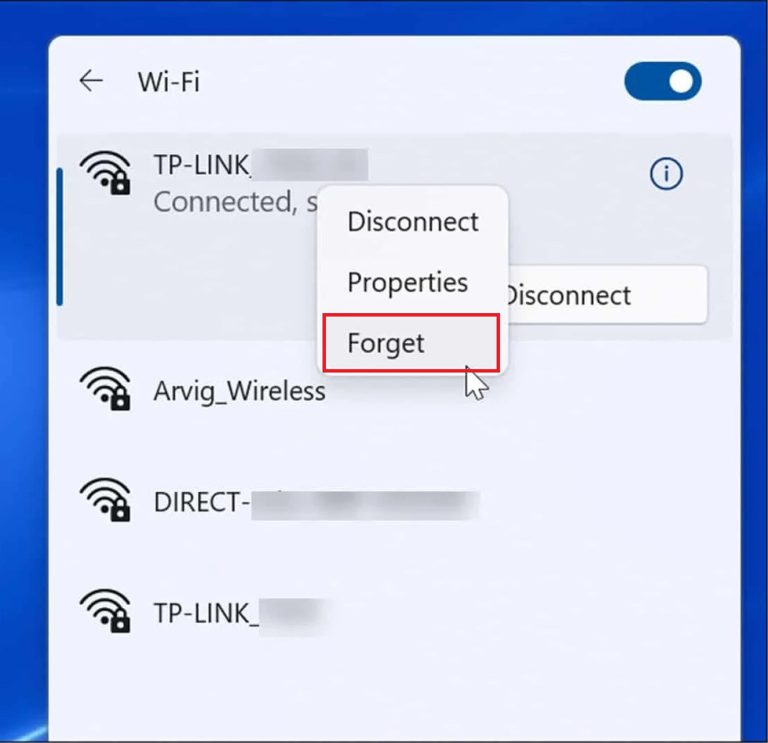
If your device displays the error message, “Can’t connect to this network” (or something similar), it may be that the router needs to be power cycled (rebooted), or the device might be using an incorrect passcode/PIN to connect to the Wi-Fi. Access the device’s settings and instruct it to “forget” this wireless network. On iOS and Android, this can be accomplished either by a long press or sometimes within the network settings itself. In Windows 10/11, you will need to right-click the Wi-Fi network and select “Forget.” Click on the network again and enter the correct Wi-Fi passcode/PIN, then check to see if you can connect successfully.
If your device is properly connected to Wi-Fi or Ethernet, and still wont connect to the Internet keep going…
2. Resetting your Network Adapter
Each devices operating system has its own way to do this so you will need to potentially look this up, but this will ultimately set your devices network adapter back to factory defaults. We will provide you examples for Windows, iOS, and Android.
Microsoft Windows
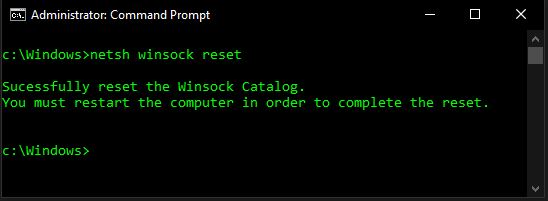
To reset your network adapter in Microsoft Windows, you will need to open a command prompt as administrator. Go to start menu and type “command”. You see Command Prompt and an option to “Run as Administrator” – click that, and a black window will appear on your screen. Now type in:
					netsh int ip reset reset.txt
netsh winsock reset
You should see the following messages if you did this successfully. If you see the messages below, go ahead and restart your computer and then recheck to see if you have a working internet connection.

Apple iOS
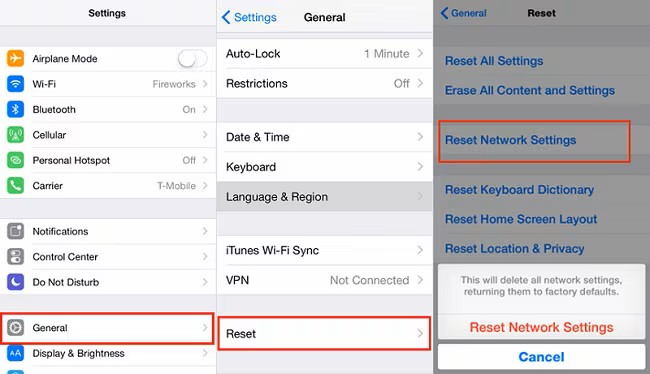
To reset your network settings on iOS go to Settings > General > Reset > Reset Network Settings
Android OS
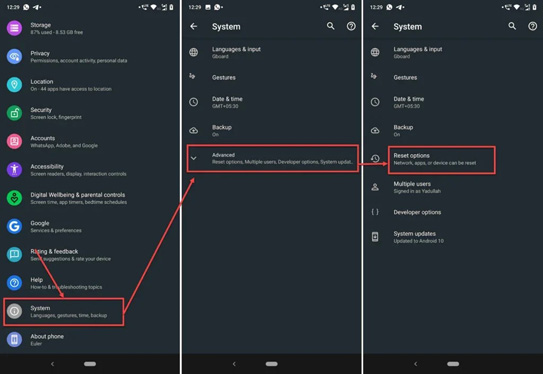
To reset your network settings in Android OS go to Settings > System > Reset Options > Reset Bluetooth & Wi-Fi
Other Devices
To reset your network settings on any other device you will need to find the “Reset Network Connections” option in the settings menu. Each device is different, so be patient when looking for this setting. If you are unable to find it, reach out to the manufacturer of the device and see if they can offer you assistance in doing this – many will happily walk you through performing this action.
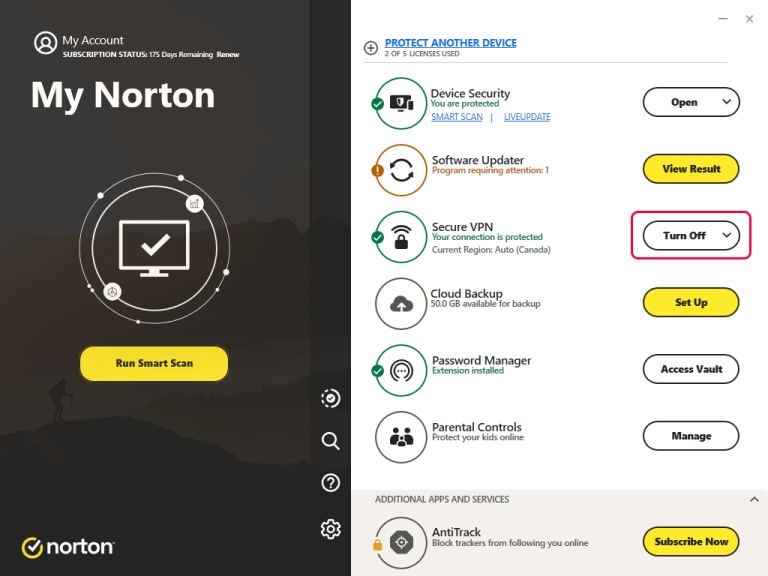
3. Check if you are using VPN software to connect to the Internet
While it is not common, we have encountered several instances where customers use VPN software on their devices to connect to the internet “securely.” Occasionally, this software can have issues that disrupt the internet connection. Try disabling the software, turning off the VPN, or even uninstalling it completely if you cannot find a way to prevent it from running. If you are unable to do this, contact the software company for assistance in disabling their software (or removing it). If it’s determined to be causing your issue, reach out to the VPN provider for help in resolving the problem.
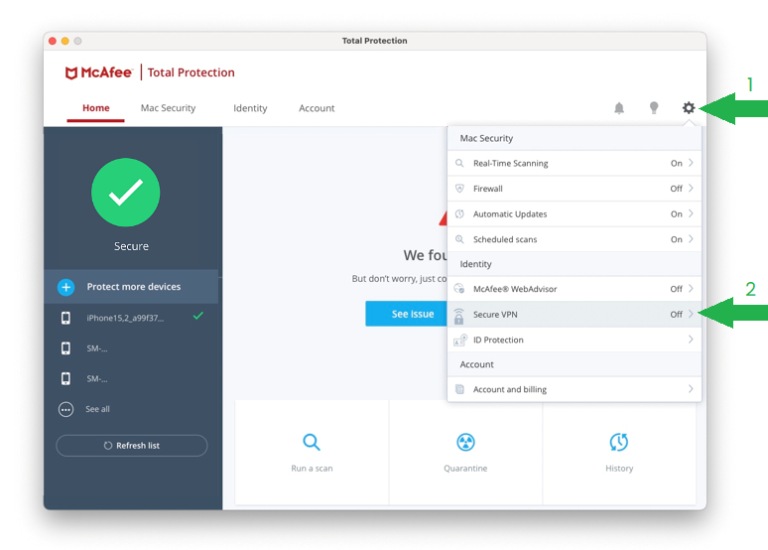
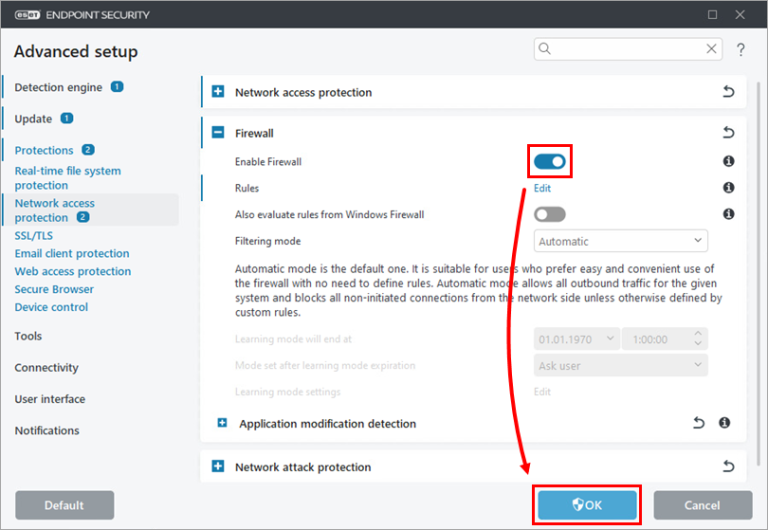
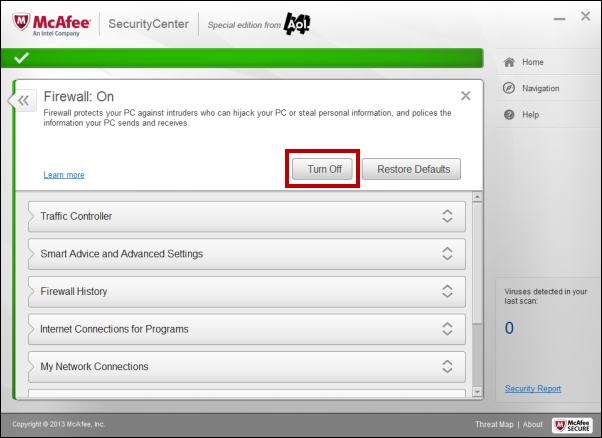
4. Temporarily Disable Your Antivirus Software’s Firewall
Ask any teenager, and they’ll tell you that sometimes the things meant to keep us safe can often get in the way of what we want to do! Your computer’s antivirus software is no different. Sometimes it interferes with your ability to get online.
The easiest way to determine if it is preventing you from accessing the internet is to “pause” the protection it provides. Each software is different, but generally, you want to disable any “Network” or “Firewall” protection when troubleshooting these types of issues. If it turns out to be the source of the problem, reach out to the software manufacturer for assistance in fixing whatever setting is causing you trouble. They are often happy to help.
5. Perform a Ping Test
If the device you are having problems connecting to the internet is a computer, you’re in luck! You can test exactly where the connection is breaking down on the device using a free utility called the Ping. It works by sending a small packet of information to a remote destination and then asks for it to send a reply back. If a reply is received it is reported into the console along with the latency (how long it took) and if it missed any individual packets of communication. To perform a ping test do the following:
Open a command prompt by going to the start menu and typing “command”, and click on “Open”. A black window will appear. Type in the following and hit enter after every line (you can also copy and paste into the window):
					ping 192.168.1.1
ping 192.168.0.1
ping 8.8.8.8
ping www.google.com
Your computer will automatically send out 4 packets of information for each of the above destinations. A valid “Reply” will say which destination replied and how long it took to get there, likewise the test will report if the “Request timed out”. If your internet connection is working properly each of the 4 above locations should reply successfully. If you do not receive a reply from a specific destination that is likely where your problem is. Look there first before heading onto step 6.
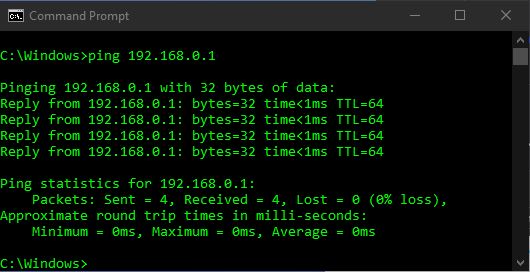
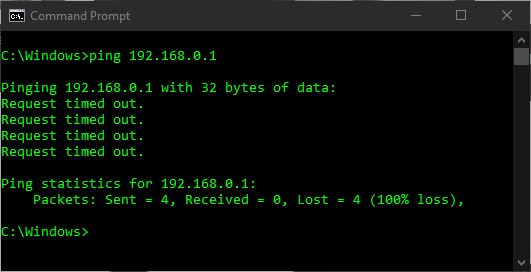
The first location of “192.168.1.1” will typically be your Wi-Fi router, depending on how your network is configured. The second location of “192.168.0.1” is the CGI CPE device on your roof. The third location of “8.8.8.8” is Google’s Public DNS server, and the location of “www.google.com” is Google’s Public Webserver.
The last test is unique because it forces your computer to turn “www.google.com” into a IP address like 142.250.69.4 in order to communicate with it. This tests whether or not DNS is functioning properly on your computer as it is possible to be able to reach the internet, and still not browse to websites.
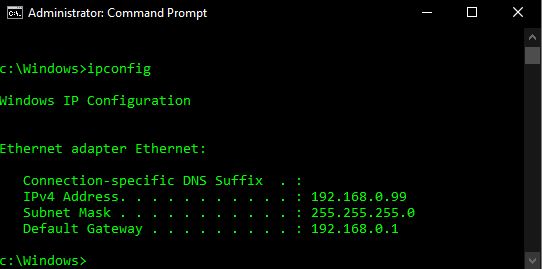
If the “192.168.1.1” location does not reply but the others do – it might be possible that your router is using a different set of IP addresses to communicate with your device. You can check what your “Default Gateway” is by typing the following into a command prompt:
ipconfig
6. Seek the help of a Professional
Ok, so you gave it your best collegiate effort and its still not working… now its time to enlist the help of a professional. Grab a cold drink and pickup your phone – we’ve been waiting patiently to assist you.
520-421-3333 opt. 2